Methods of Sealing with Siliconized Sealant
Sealing is critical for the durability and energy efficiency of structures. Siliconized mastic, with its flexible structure and water resistance, is an ideal material for sealing. In this article, we will discuss in detail the methods of sealing with siliconized mastic, the correct application techniques, and the points to consider.
What is Sealing and Why is it Important?
Sealing refers to applications that prevent water, air, and moisture from passing through or out of building elements. Inadequate sealing can lead to deformation of building materials, energy loss, and reduced comfort. Thanks to its elastic structure, siliconized mastic provides long-lasting sealing in moving joints and connection points.
Applications in Sealing
The main areas where silicone sealant can be used for sealing are:
- Window and door joints: These are critical areas for airtight and watertight sealing.
- Bathroom and kitchen: Provides watertightness around sinks, showers, and bathtubs.
- Exterior applications: Prevents water and air penetration in wall panels, joints, and glass facades.
- Industrial applications: Provides moisture and water tightness in storage, production, and laboratory areas.
Sealing Methods with Siliconized Mastic
1. Surface Preparation
The most critical step in ensuring a watertight seal is proper surface preparation. The surface must be clean, dry, and free of grease. Old sealant residue or dust can prevent the sealant from adhering. The preparation steps are as follows:
- Cleaning dust, dirt and grease.
- Roughening the surface with light sandpaper if necessary.
- Protecting joint edges with masking tape.
2. Choosing the Right Sealant
In sealing applications, the type of sealant used is important. Siliconized sealant is preferred for both indoor and outdoor use due to its resistance to water and moisture. Transparent, white, or colored options are available depending on the application area.
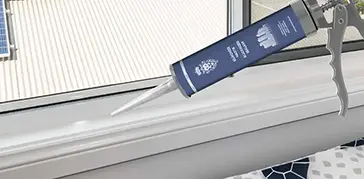
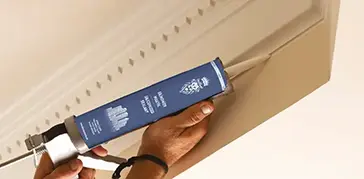
3. Application Technique
The sealant should be applied evenly to the joint using a sealant gun. Points to note:
- The gun angle should be approximately 45 degrees.
- The sealant should completely fill the gaps, without forming air bubbles.
- After application, smoothing should be done with a spatula or finger.
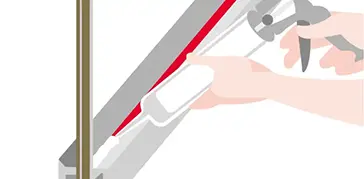
4. Cleaning Up Excess Product
After applying the sealant, any excess product on the joint surface should be cleaned with a damp cloth or spatula. This step ensures both an aesthetically pleasing appearance and helps extend the lifespan of the seal.
5. Installation and Fixing
The surface should not be touched until the sealant is completely dry. Drying time varies depending on ambient temperature and humidity. Complete drying guarantees a watertight seal.
Tips to Improve Tightness
- Joint width should be accurately measured and the depth of the sealant checked before application.
- Clean edges can be ensured with masking tape.
- During the application, the gun should be used in a steady and controlled manner.
- The spatula should be slightly damp for smoothing; this will help the sealant adhere to the surface.
- The curing time must be followed strictly according to the manufacturer's recommendations.
Conclusion
When applied with the correct techniques, siliconized sealant provides both water and airtightness and increases the durability of structures. Surface preparation, appropriate sealant selection, correct application, and attention to drying time are critical for long-lasting sealing. Thanks to these methods, it can be safely used in both interior and exterior applications.
The information in this text may vary from time to time depending on the manufacturer. Always check the product label.